Auto-fill lookup details in Power Pages: inbuilt and code methods
28 May 2026 · 10 min read

Auto-populating lookup details in Power Pages is one of the most requested features for form automation. When users select a record from a lookup field, you want the associated details to automatically fill the remaining form fields.
This comprehensive guide covers three proven methods that work reliably for form autofill in Power Pages. Whether you're building customer portals, employee self-service forms, or partner registration systems, implementing Dataverse lookup auto-complete will significantly improve user experience and reduce data entry errors.
What is Power Pages lookup auto-population
Power Pages form enhancement through lookup auto-population automatically fills form fields with related data when users select a record from a lookup field.
This functionality serves multiple business purposes:
- Ensures data consistency by pulling information directly from your Dataverse records
- Reduces form abandonment rates by minimizing required user input
- Prevents duplicate or incorrect lookup information
Modern users expect intelligent forms that adapt based on their selections. When implementing Power Pages lookup forms, auto-population becomes essential for professional user experiences that compete with commercial web applications.
Before implementing any method, ensure your Power Pages site has:
- Entity records with populated data
- Forms configured with lookup fields
- Appropriate security permissions
3 methods to auto-fill lookup details in Power Pages
Here are three proven approaches to implement form autofill functionality, ranging from no-code solutions to advanced custom development methods.
Method 1: Built-in basic form metadata (no-code solution)
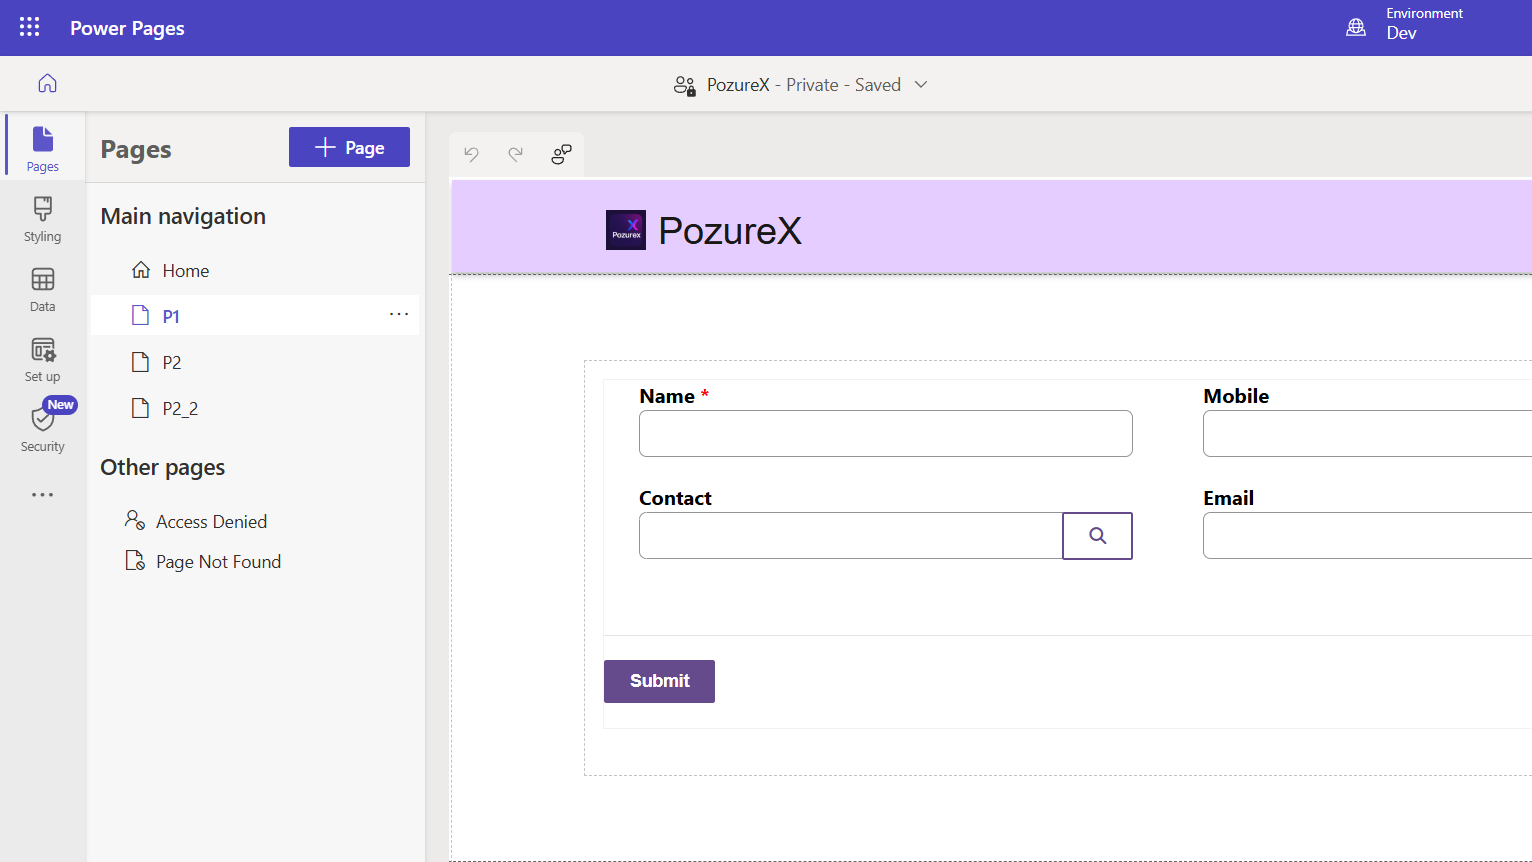
This approach uses Power Pages' native functionality to auto-populate fields using Basic Form Metadata. It's perfect for scenarios where you need to auto-fill current portal user information from lookup relationships.
Step 1: Access the Power Pages Management app
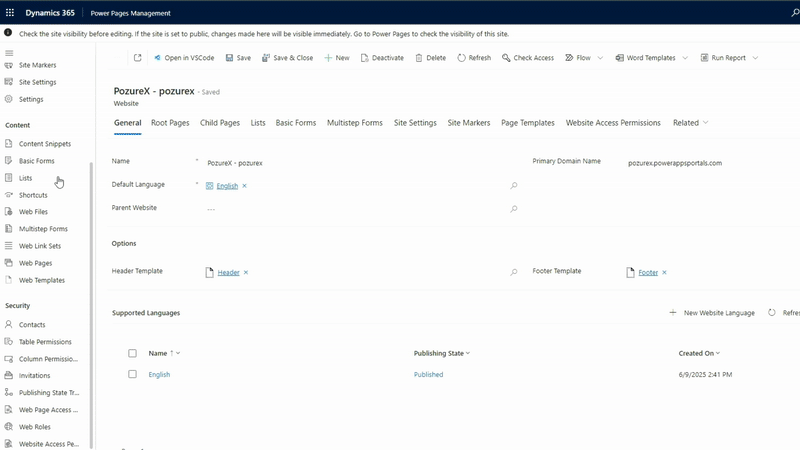
Open your Power Pages site in Design Studio.
Click "..." then "Power Pages Management app" for advanced form settings.
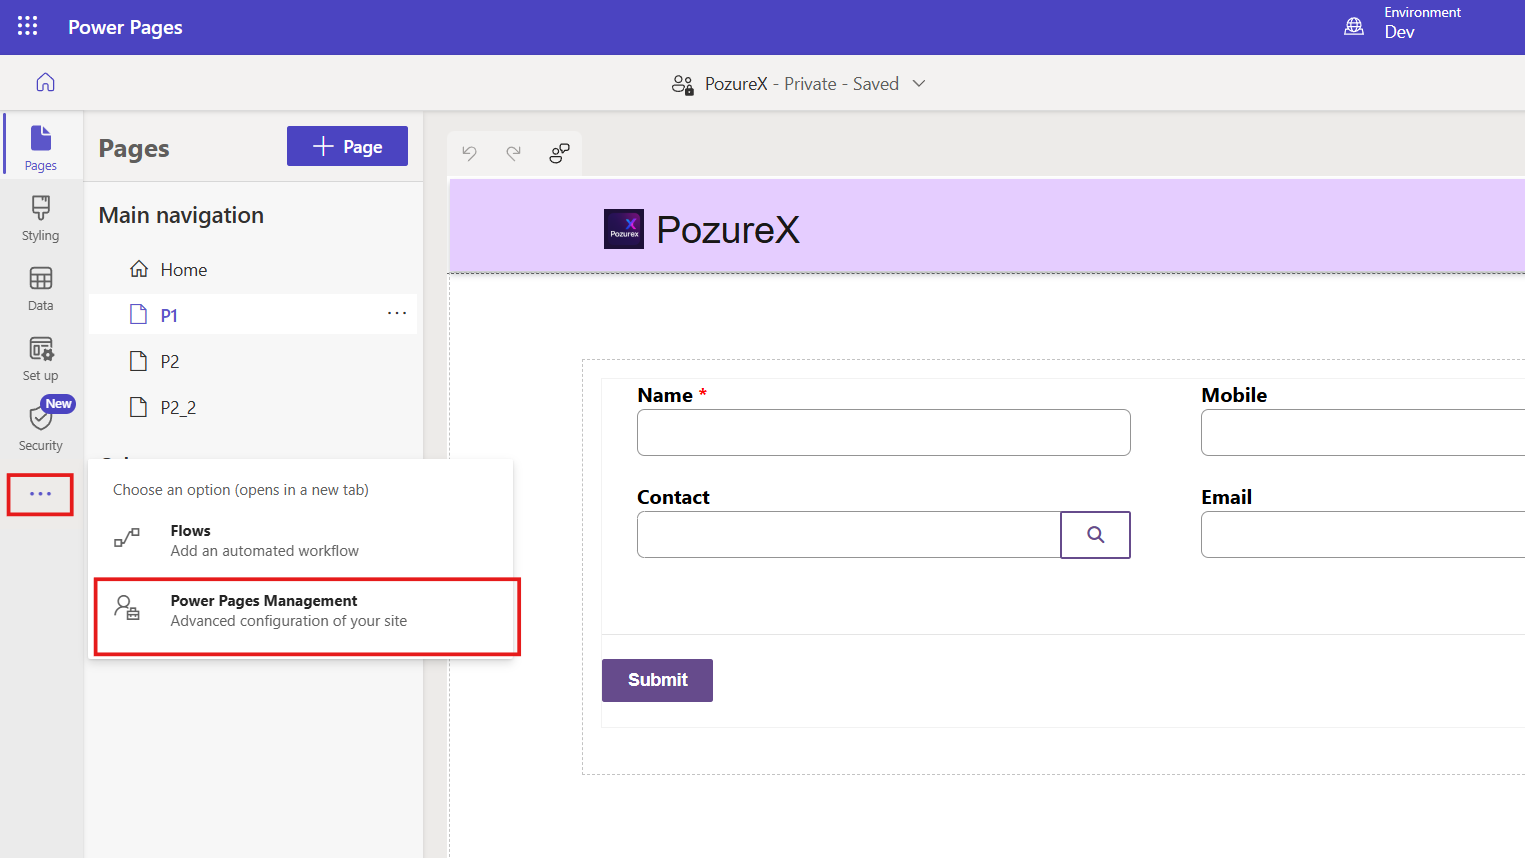
The Power Pages Management app provides deeper control over form behavior compared to the standard Design Studio interface.
Step 2: Configure basic form metadata
In the Power Pages Management app, locate your form and switch to the "Basic Form Metadata" tab.
Click "New Basic Form Metadata".
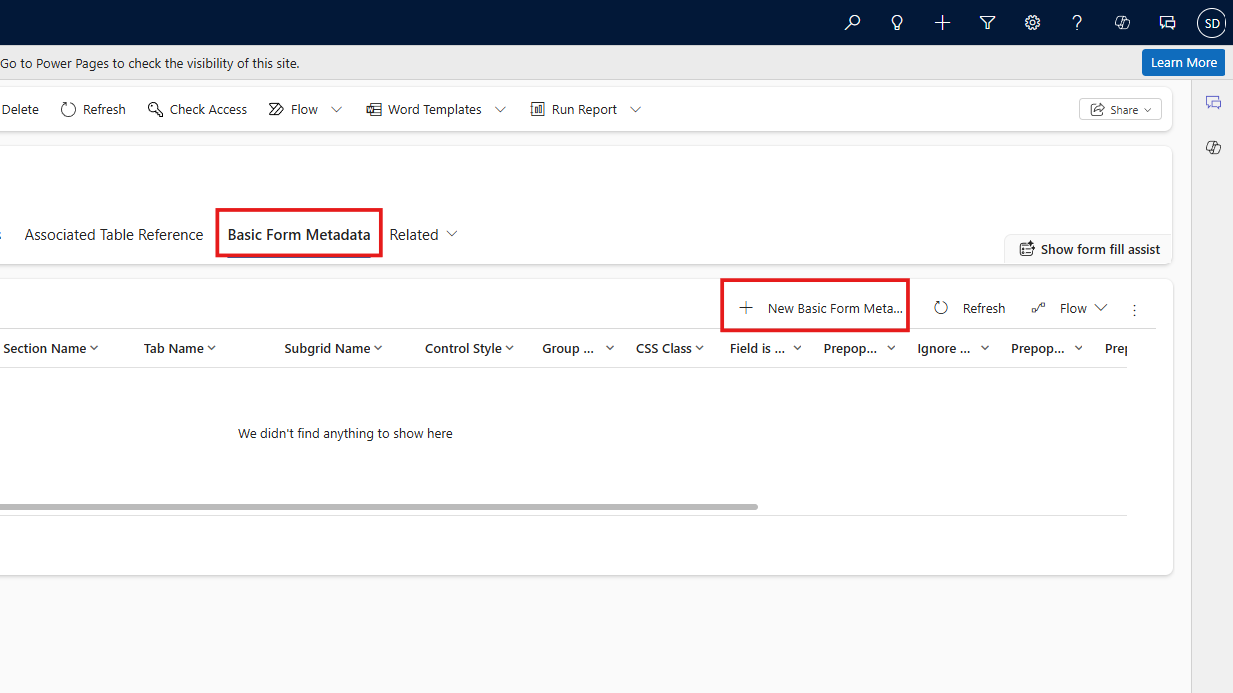
This metadata tells Power Pages how to automatically populate specific fields when the form loads or when certain lookup events occur.
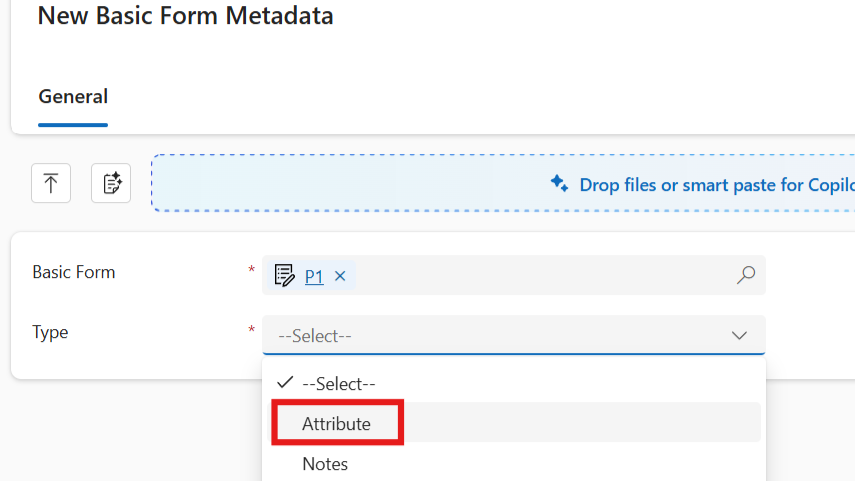
Step 3: Set up field attributes
Configure the metadata with these essential settings:
Type: Select "Attribute" to specify you're working with form field attributes.
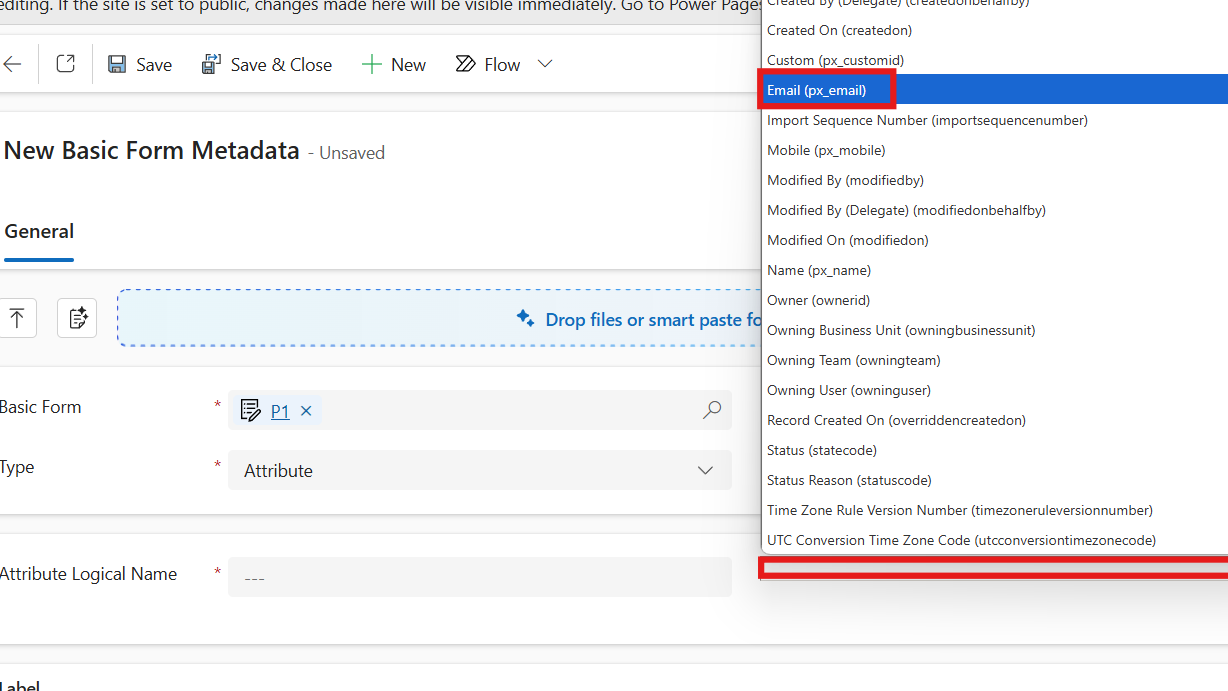
Attribute Logical Name: Choose the target field where auto-populated data will appear (e.g., "px_email" for email field).
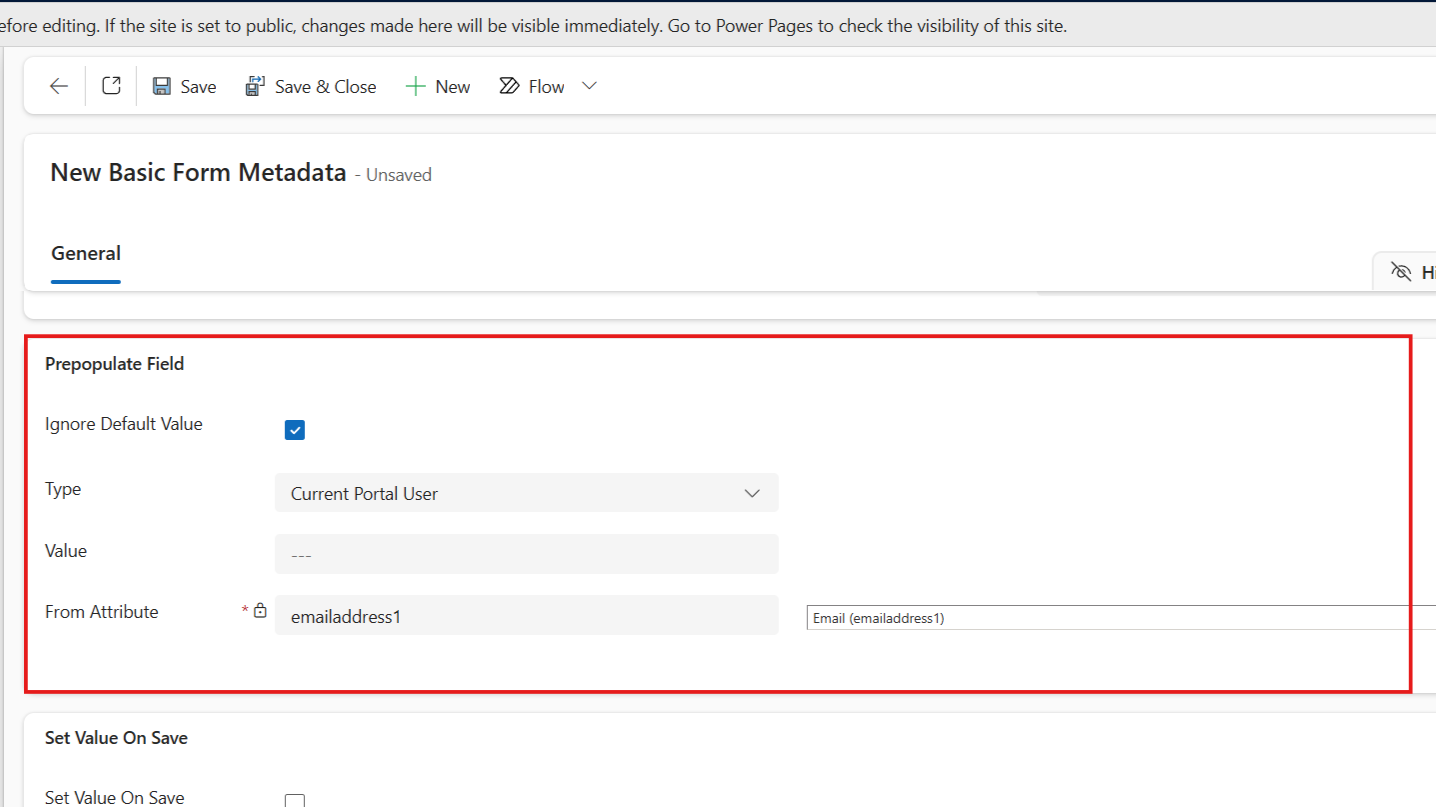
Prepopulate Configuration:
- Check "Ignore Default Value" to override any existing field defaults
- Set Type to "Current Portal User"
- Select the source field from the lookup entity in "Form Attribute"
Once done, Save & Close the form.
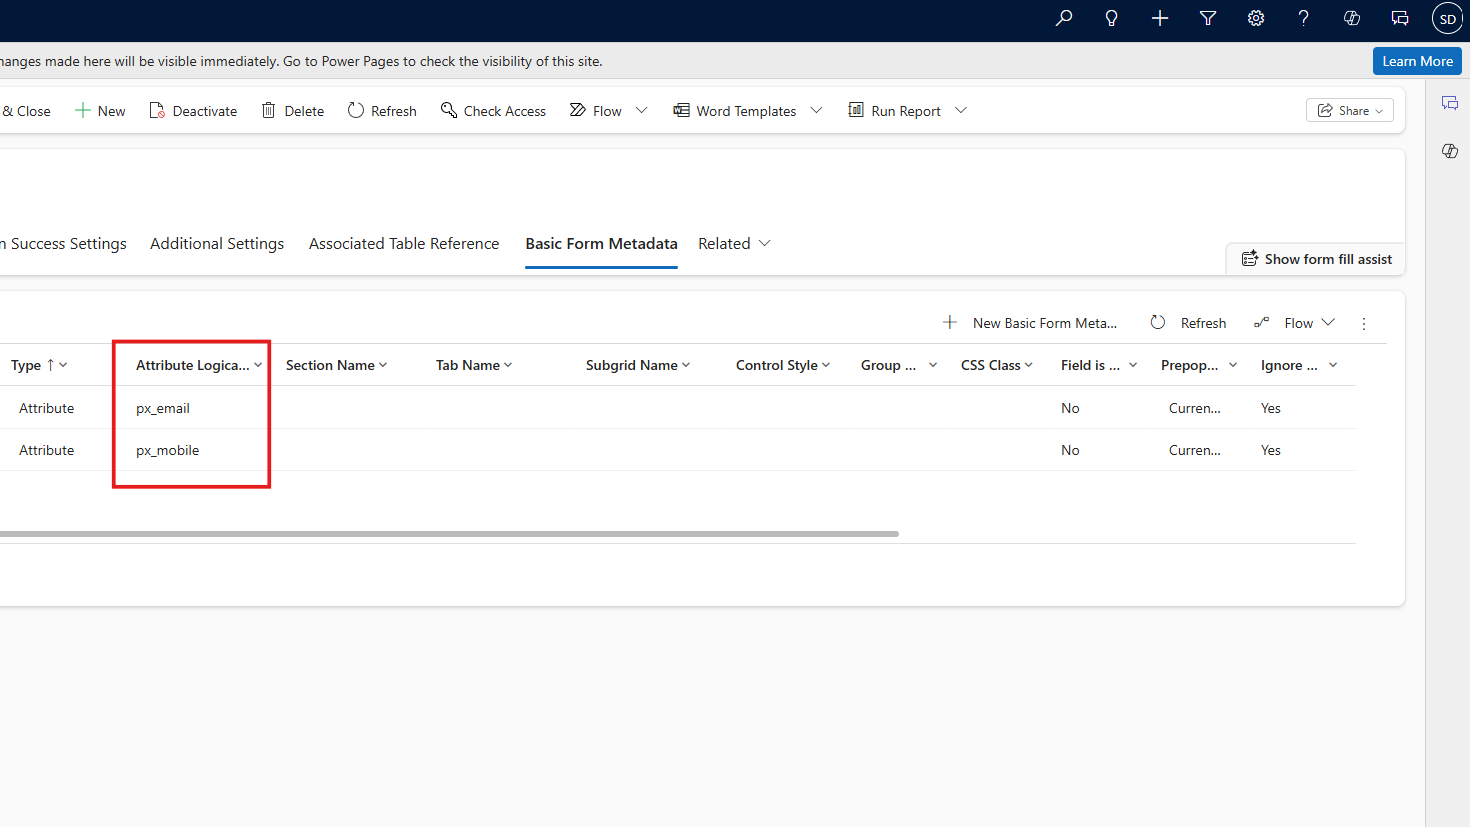
Step 4: Create multiple metadata entries
Repeat this process for each field you want to auto-populate from the lookup.
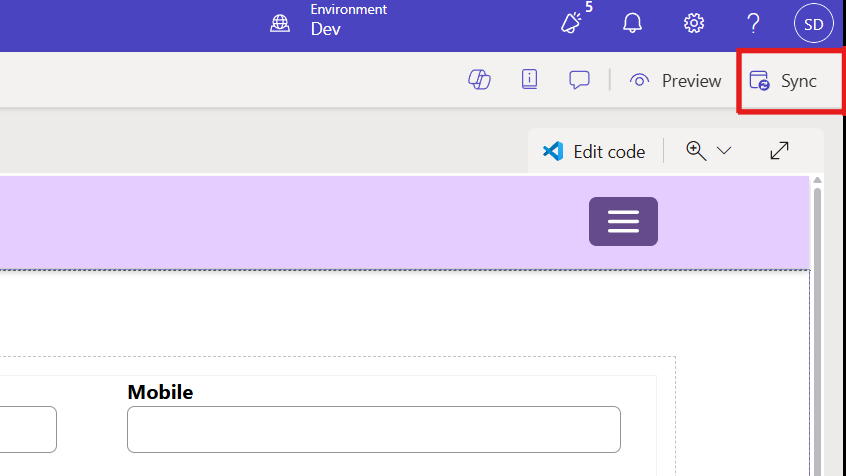
Step 5: Sync and test
Save your metadata configurations and sync the changes in Design Studio.
Reload the page on your website, the fields should be auto-populated.
This method works well for authenticated users but has limitations when dealing with dynamic lookup-based auto-population for different records.
Method 2: Web API with access token integration
This server-side approach uses Dataverse Web API calls with proper authentication to retrieve and populate lookup information based on user selections.
Step 1: Configure site settings for Web API access
In the Power Pages Management app, navigate to Site Settings and add these mandatory configurations for your lookup entity:
- Name: Webapi/contact/enabled, Value: true
- Name: Webapi/contact/disableodatafilter, Value: false
- Name: Webapi/contact/fields, Value: emailaddress1,mobilephone,telephone1 (specify required fields)
- Name: Webapi/contact/website, Value: Your website identifier
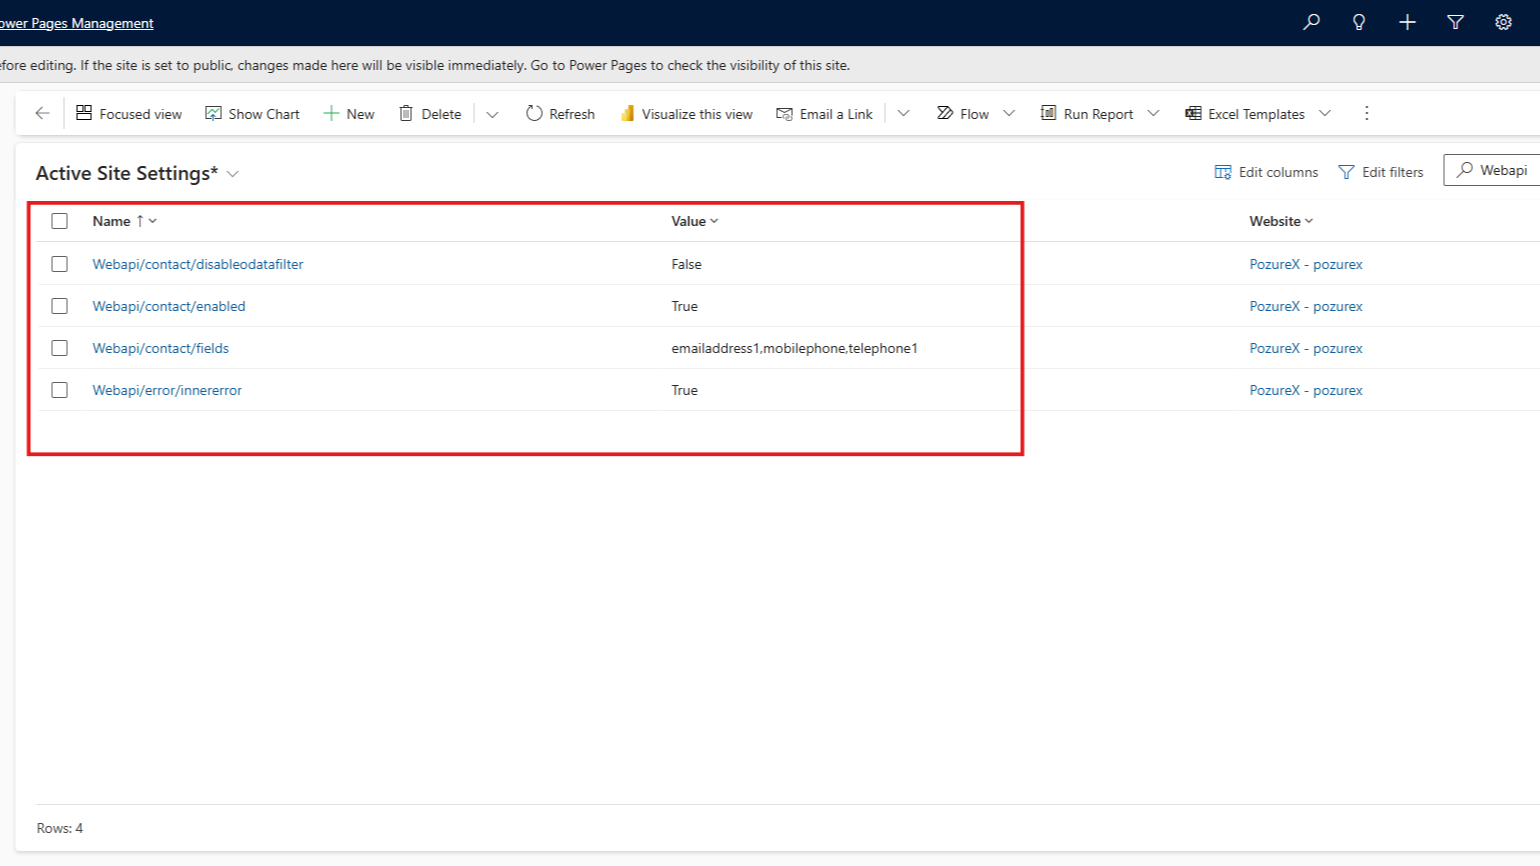
These settings enable Web API access for the lookup entity while maintaining security by limiting accessible fields.
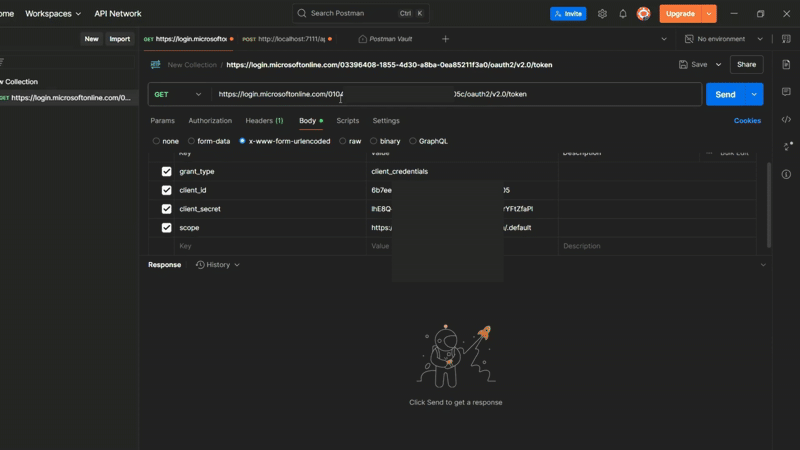
Step 2: Generate access token
For this method, you'll need a valid access token to authenticate with Dataverse Web API. You can generate this through:
Power Automate Flow: Create a scheduled flow that generates tokens using HTTP connector with your app registration credentials.
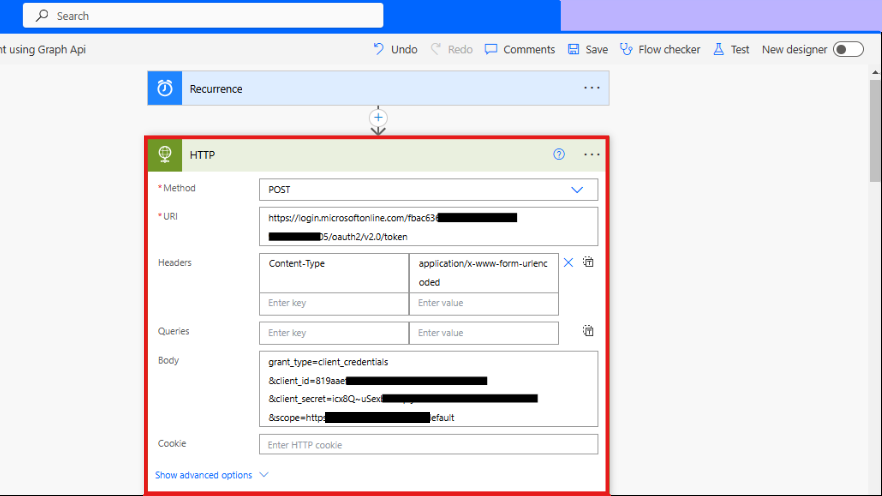
Postman/API Testing Tools: Use OAuth 2.0 client credentials flow with your Azure app registration details.
Step 3: Implement AJAX query logic
Create JavaScript code that triggers when the lookup field changes and makes authenticated API calls to retrieve lookup record information:
<!-- Note: Modify the "bearerToken" and your "apiBaseUrl", as well as your entity form name: "{% entityform name: 'P1' %}" -->
<div class="row sectionBlockLayout text-start" style="display: flex; flex-wrap: wrap; margin: 0px; min-height: auto; padding: 8px;">
  <div class="container" style="display: flex; flex-wrap: wrap;">
    <div class="col-lg-12 columnBlockLayout" style="flex-grow: 1; display: flex; flex-direction: column; min-width: 250px; padding: 16px; margin: 60px 0px;">

      {% comment %} Handle px_contact changes with API integration {% endcomment %}
      <script>
        $(document).ready(function() {
          const apiBaseUrl = "https://[Your Org Url]/api/data/v9.2";
          const bearerToken = "Your Access Token";


          // Wait for form to fully load
          setTimeout(function() {
            // Listen for px_contact attribute changes
            $("[data-attribute='px_contact'], input[name*='px_contact'], select[name*='px_contact']").on("change", function() {
                 var selectedContactId = $(this).val();
                 console.log("px_contact changed to:", selectedContactId);


                 if (selectedContactId) {
                   // Clean the contact ID (remove curly braces if present)
                   selectedContactId = selectedContactId.replace(/[{}]/g, '');


                  // Fetch contact details from Dataverse API
                  $.ajax({
                  url: `${apiBaseUrl}/contacts(${selectedContactId})?$select=emailaddress1,mobilephone`,
                  type: "GET",
                    contentType: "application/json",
                    headers: {
                      "Authorization": "Bearer " + bearerToken,
                      "OData-MaxVersion": "4.0",
                      "OData-Version": "4.0",
                       "Accept": "application/json"
                    },
                    success: function(contactData) {
                      console.log("Contact data retrieved:", contactData);

                      // Populate px_email field
                    if (contactData.emailaddress1) {
                      $("input[data-attribute='px_email']").val(contactData.emailaddress1);
                          $("#px_email").val(contactData.emailaddress1);
                      }


                      // Populate px_mobile field
                      if (contactData.mobilephone) {
                          $("input[data-attribute='px_mobile']").val(contactData.mobilephone);
                               $("#px_mobile").val(contactData.mobilephone);
                           }


                           // Trigger change events
                           $("input[data-attribute='px_email']").trigger('change');
                           $("input[data-attribute='px_mobile']").trigger('change');


                           console.log("px_email and px_mobile populated from contact API");
                         },
                         error: function(xhr, status, error) {
                            console.error("Error fetching contact data:", xhr.responseText || error);


                           if (xhr.status === 401) {
                             console.error("Authentication failed - token may be expired");
                           } else if (xhr.status === 404) {
                               console.error("Contact not found with ID:", selectedContactId);
                           }
                       }
                     });
                   } else {
                       // Clear fields if no contact selected
                       $("input[data-attribute='px_email']").val('');
                       $("input[data-attribute='px_mobile']").val('');
                       $("#px_email").val('');
                       $("#px_mobile").val('');
                       console.log("px_email and px_mobile fields cleared");
                  }
                });


              }, 1000);
            });
           </script>

           {% entityform name: 'P1' %}
      </div>
    </div>
  </div>
Modify the "bearerToken" and your "apiBaseUrl", as well as your entity form name: "{% entityform name: 'P1' %}".
And Voilà!
This approach provides maximum flexibility but requires careful token management and security considerations.
Method 3: Native Power Pages Web API (recommended)
This is the cleanest solution that uses Power Pages' built-in Web API capabilities without requiring external authentication tokens for Dataverse lookup auto-complete.
Step 1: Enable lookup entity Web API
Configure these site settings to enable native Web API access for your lookup entity:
- Name: Webapi/contact/enabled, Value: true
- Name: Webapi/contact/disableodatafilter, Value: false
- Name: Webapi/contact/fields, Value: * (or specify field names)
- Name: Webapi/error/innererror, Value: true
The asterisk (*) enables all fields, but for better performance and security, specify only required fields: emailaddress1,mobilephone,telephone1,fullname
Step 2: Add custom JavaScript to form
In the Power Pages Management app, open your form and navigate to "Additional Settings."

Add this JavaScript code in the "Custom JavaScript" section:
// Optimised Power Pages Contact Lookup - Minimal Code
$(document).ready(function() {
    $("#px_contact").on("change", function() {
            var contactId = $(this).val()?.replace(/[{}]/g, "");
            var emailField = $("#px_email");
            var mobileField = $("#px_mobile");


            if (contactId) {
                $.get("/_api/contacts(" + contactId + ")?$select=emailaddress1,mobilephone")
                .done(function(data) {
                         emailField.val(data.emailaddress1 || "");
                         mobileField.val(data.mobilephone || "");
                    })
                    .fail(function() {
                        console.log("Failed to fetch contact data");
                    });
            } else {
                emailField.val("");
                mobileField.val("");
            }
      });
});
// Change the fieldnames as required
This method provides the best balance of functionality, security, and maintainability for most Power Pages form enhancement implementations.
Choosing the right method for your project
Method 1 (Basic Form Metadata) works best when:
- You need to auto-populate current user information
- No-code solution is preferred
- Simple field mapping requirements
Method 2 (Web API with Token) is ideal when:
- You need maximum control over API calls
- Working with external integrations
- Complex business logic is required
Method 3 (Native Web API) is recommended when:
- You want clean, maintainable code
- Security and performance are priorities
- Standard lookup auto-population is sufficient
Troubleshooting common Power Pages lookup issues
Fields not populating
Verify field names match exactly (case-sensitive) and check browser console for JavaScript errors. Ensure Web API permissions are correctly configured.
API calls failing
For token-based methods, confirm access tokens haven't expired. For native API methods, verify site settings are properly configured.
Lookup events not triggering
Check that you're targeting the correct HTML elements and that event handlers are properly bound after page load.
Performance issues
Implement field caching and avoid unnecessary API calls by checking if data already exists before making requests.
Security considerations for Power Pages forms
When implementing contact auto-population, always follow security best practices:
- Limit Web API field access to only required data
- Implement proper error handling to prevent information disclosure
- Use HTTPS for all API communications
- Validate user permissions before displaying sensitive contact information
- Consider implementing rate limiting for API calls
Advanced implementation tips
For production environments, consider these enhancements:
Caching Strategy: Implement local storage or session-based caching to reduce API calls for frequently accessed contacts.
Progressive Loading: Show loading indicators during API calls to improve user experience.
Fallback Mechanisms: Provide manual input options when auto-population fails.
Multi-Language Support: Ensure your JavaScript handles localized field names and error messages.
Frequently Asked Questions
Why aren't my lookup fields populating after implementing the JavaScript?
Check that field names match exactly (case-sensitive), verify Web API is enabled in site settings for your lookup entity, and use browser developer tools to check for JavaScript errors. Ensure you're targeting the correct HTML elements.
Do I need special permissions to enable Web API access for lookup entities?
Yes, you need administrative access to Power Pages Management app to configure site settings. The authenticated user also needs read permissions on the lookup entity.
Can I use these methods with other Dataverse entities besides contacts in my lookups?
Absolutely! The same principles apply to any Dataverse entity lookup (except for approach 1). Just replace "contact" with your target entity name in the site settings and API calls.
How do I handle scenarios where the lookup field is cleared?
Add event handlers for field clearing and implement a function to reset auto-populated fields to empty values when the lookup selection is removed.
Is there a performance impact with Method 3's native Web API calls for lookup data?
Native Web API calls are optimized and generally perform well. For high-traffic scenarios with frequent lookup selections, consider implementing caching or limiting the frequency of API calls.
Can I auto-populate fields from related entities (not just direct lookup fields)?
Yes, but you'll need to modify the API queries to include related entity data using $expand parameters or make separate API calls for related lookup records.
What happens if a lookup record doesn't have the required field data?
The JavaScript should handle null or undefined values gracefully. Implement proper error handling to prevent form errors when lookup data is missing.
Got a project in this space?
We build this kind of work for clients across the UK and beyond. Tell us what you’re planning and we’ll come back within one working day.
Send a brief